Symptom
Symptom | What It Means |
|---|---|
External oil leak — oil pooling under the engine, typically at the bottom of the bellhousing or along the cylinder head-to-block seam | The head gasket has failed at the oil return passages. Most common on the driver's side. |
Overheating — temperature gauge spikes, especially under load or at idle | Combustion gases are entering the cooling system through a failed gasket. The system pressurizes and pushes coolant out. |
White smoke from exhaust (continuous, not just on cold start) | Coolant is being drawn into the combustion chamber. This is a sign of an internal leak. |
Coolant loss with no visible external leak | Coolant is being burned or pushed out through the overflow tank. |
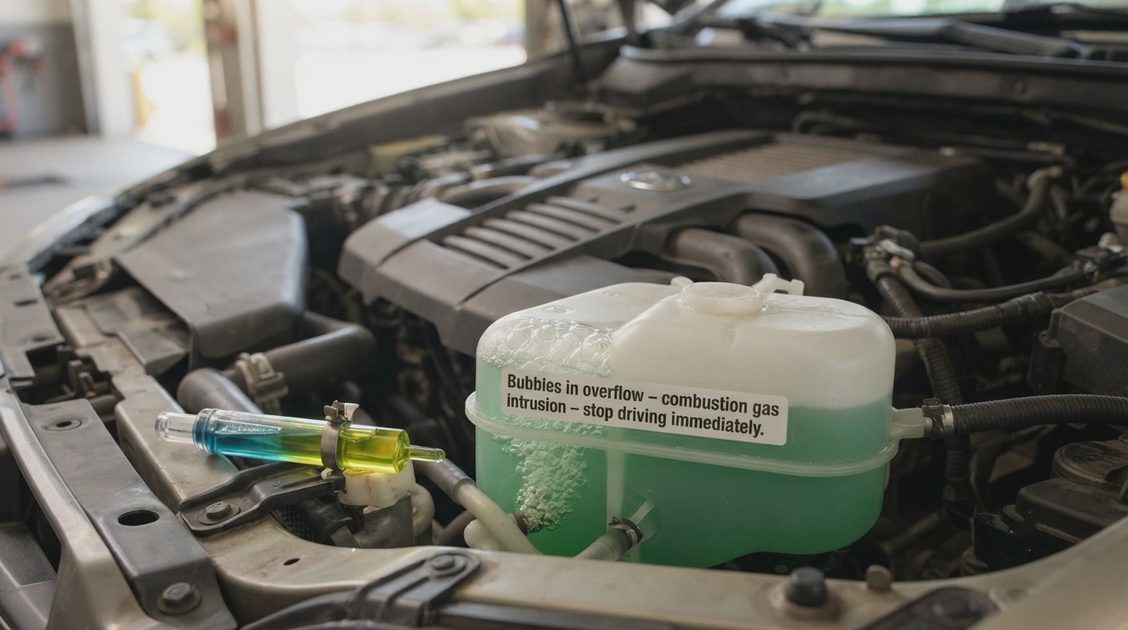
Bubbles in the coolant overflow tank | Combustion gases are escaping into the cooling system. |
Check engine light with misfire codes (P0301, P0302, P0303, P0304) | Coolant or combustion gas has compromised combustion in one or more cylinders. |
Rough idle, especially on cold start | Incomplete combustion due to coolant intrusion or compression loss. |
⚠️ The EJ25 head gasket failure is not a question of "if" — it's a question of "when." Subaru's original single-layer gaskets were flawed from the factory. If your EJ25 has over 100,000 miles and hasn't had the head gaskets replaced, they will fail. The only variable is when and how spectacularly.
One more thing: The EJ25 is an interference engine. If the timing belt breaks, the pistons will hit the valves. When you're doing head gaskets, you're also doing a timing belt and water pump. It's not optional — it's part of the job.
Diagnosis — Confirming What You Probably Already Know
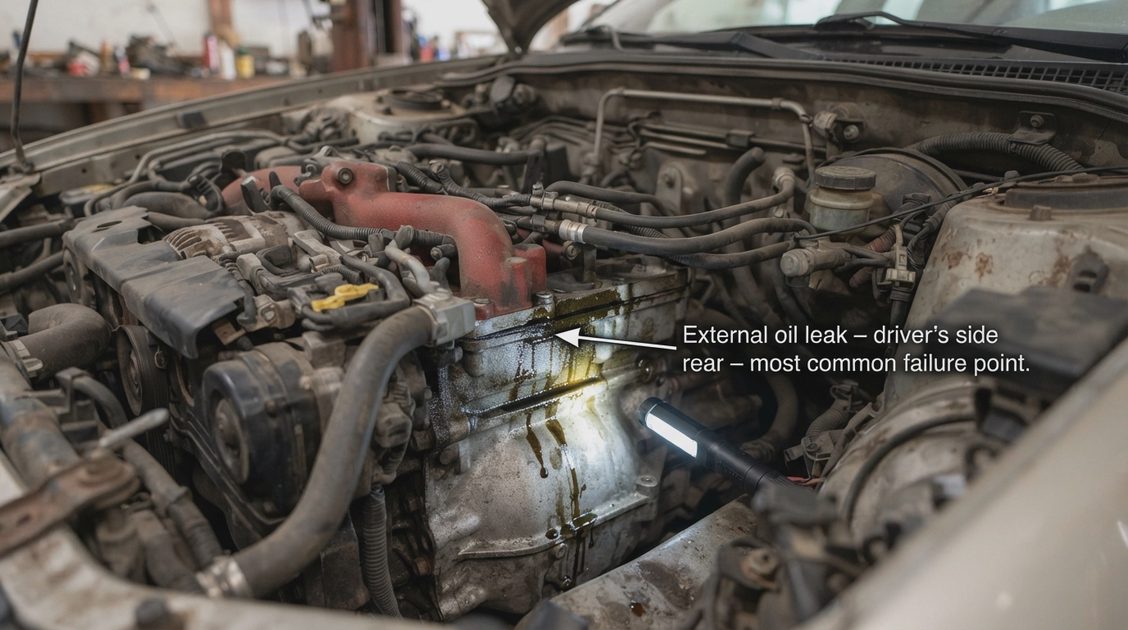
Step 1: External inspection. Park the car, let it cool, and get under it. Look for oil seepage along the cylinder head-to-block seam, especially on the driver's side at the rear. If you see oil dripping from the bottom of the bellhousing, the head gasket is leaking.
Step 2: Check the coolant overflow tank. With the engine cold, look at the coolant level. If it's low, top it up. Then start the engine and watch the overflow tank. If bubbles appear (a steady stream, not just a few), combustion gases are entering the cooling system.
Step 3: Block test (chemical test for exhaust gases in coolant). Buy a combustion leak test kit (usually a fluid that changes color when exposed to CO₂). With the engine warm, draw air from the coolant reservoir through the tester. If the fluid changes from blue to green/yellow, you have combustion gases in the coolant. This is a definitive test.
Step 4: Compression test. Low compression in one cylinder (especially adjacent cylinders, like 2 and 4, or 1 and 3) indicates a head gasket failure between cylinders or a valve issue.
Step 5: Check for coolant in the oil. Pull the dipstick. If the oil looks like a milkshake (or is a suspiciously dark chocolate color), coolant has mixed with the oil. This is serious — it means the internal leak has gotten bad enough to contaminate the entire lubrication system.
Pro tip: If you have bubbles in the overflow tank, stop driving the car immediately. The combustion gases are pressurizing the cooling system, which will eventually cause a radiator or heater core failure — or catastrophic overheating.
Why Fel-Pro MLS Is the Answer
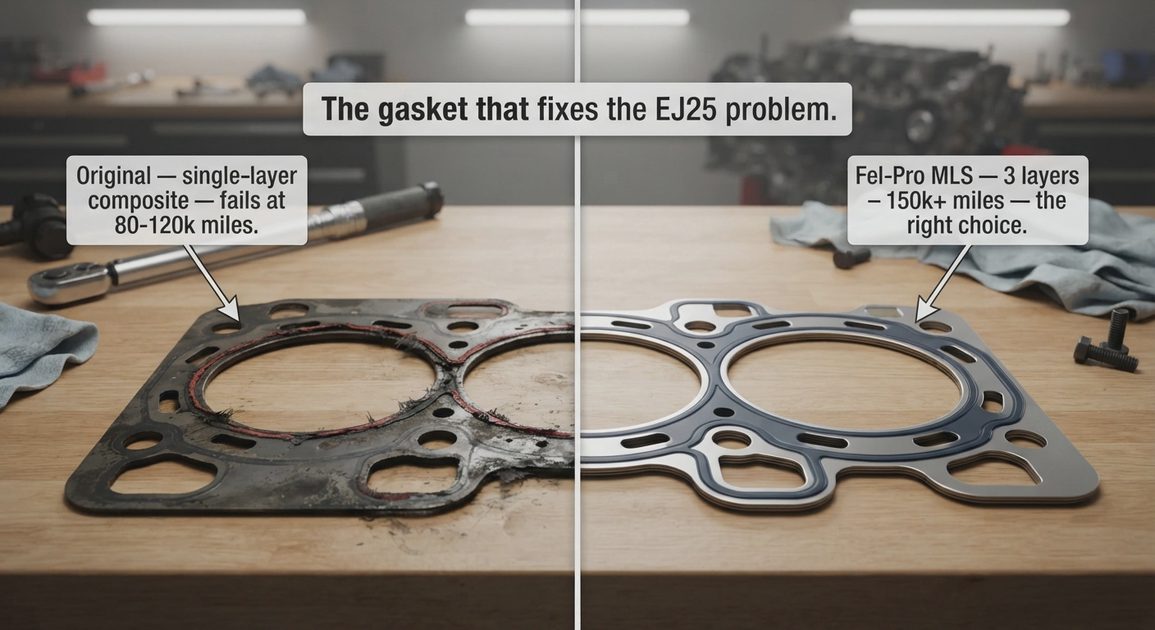
The original Subaru head gasket on the EJ25 is a single-layer composite gasket. It works fine — until it doesn't. The problem is that the EJ25 has an open-deck design (the cylinders are not fully supported by the block), and the aluminum block and head expand and contract at different rates. Over time, the single-layer gasket can't handle the movement and fails.
Fel-Pro's MLS (Multi-Layer Steel) gasket is the solution.
Feature | Original Subaru Gasket | Fel-Pro MLS |
|---|---|---|
Construction | Single-layer composite | Multi-layer steel (three layers of stainless steel) |
Sealing surface | Soft, compresses over time | Rigid, maintains clamping force |
Expansion tolerance | Limited — cannot accommodate head/block movement | Excellent — the steel layers flex with the engine |
Longevity | 80,000–120,000 miles before failure | 150,000+ miles with proper installation |
Oil sealing | Moderate — fails at oil return passages | Superior — tighter seal on oil passages |
Coolant sealing | Moderate — vulnerable to combustion gas intrusion | Superior — combustion gases stay out |
The Fel-Pro MLS gasket is the standard for EJ25 rebuilds. It's not the cheapest option, but it's the only option that doesn't eventually fail. If you're doing this job once, do it right. Buy Fel-Pro. Skip the cheap aftermarket and skip even the Subaru OEM replacement (which is still a single-layer gasket in most cases).
Tools Required
Specialty Tools
Tool | Purpose |
|---|---|
Engine support bar | Supports the engine from above while you disconnect the motor mounts and lift the engine slightly |
Torque wrench (ft-lb) | For larger fasteners |
Torque wrench (in-lb) | For smaller fasteners (cam caps, etc.) |
Angle gauge | For the head bolts — they use a torque-to-yield specification with an angle turn |
12-point socket (14mm) | For the head bolts |
10mm hex bit socket | For some of the intake manifold bolts |
12mm hex bit socket | For other fasteners |
Piston ring compressor | If you're removing pistons (unlikely for just head gaskets, but good to have) |
Vacuum / coolant filler | For bleeding the cooling system |
Spring compressor | For valve spring work (if you're doing valve seals) |
Feeler gauges | For checking valve clearance |
General Tools
Tool | Size/Type |
|---|---|
Socket set | 8mm, 10mm, 12mm, 14mm, 17mm, 19mm |
Wrenches | 10mm, 12mm, 14mm, 17mm |
Ratchet extensions | Various lengths |
Breaker bar | 1/2" drive |
Torx bits | T25, T30 |
Screwdrivers | Flat and Phillips |
Pick tool set | For cleaning gasket surfaces |
Plastic scraper set | For cleaning without damaging aluminum |
Brake cleaner | For degreasing |
Shop towels | Lots of them |
Magnetic parts tray | For keeping bolts organized |
Flashlight / headlamp | For working in tight spaces |
Parts Required
Part | Part Number (Example) | Qty | Note |
|---|---|---|---|
Fel-Pro MLS Head Gaskets | 26195PT | 2 | The correct choice. Do not substitute. |
Head bolts (OEM or ARP) | 11095AA071 (OEM) | 10 | Torque-to-yield — MUST replace |
Timing belt kit | Various (Gates, Aisin, etc.) | 1 | Includes belt, tensioner, and idlers |
Water pump | Various (OEM, Aisin) | 1 | Replace while you're in there |
Thermostat | OEM Subaru | 1 | Always replace with a genuine Subaru thermostat |
Valve cover gaskets | OEM or Fel-Pro | 2 | Replace while the engine is apart |
Spark plug tube seals | Included in valve cover kit | 4 | Replace these too |
Intake manifold gaskets | OEM | 2 | Replace while you're in there |
Exhaust manifold gaskets | OEM | 2 | Replace while you're in there |
Coolant | Subaru Super Coolant (pre-mix) | 2 gal | Use the right stuff |
Engine oil | 5W-30 (synthetic recommended) | 5 qt | Fresh oil |
Oil filter | OEM Subaru | 1 | Always use OEM |
RTV sealant | Three Bond 1217 / Subaru part 004403007 | 1 | For the cam caps and oil pan |
Threadlocker (blue) | Loctite 242 | 1 | For specific fasteners |
Pro tip: If you're doing the job and the car has over 100,000 miles, consider replacing the valve seals and checking the valve clearance while the heads are off. It's cheap insurance against future issues.
Procedure — Step-by-Step
Preparation
Disconnect the battery (negative terminal).
Drain the engine oil — remove the drain plug and let it drain completely.
Drain the coolant — remove the radiator drain plug (or lower radiator hose) and collect the coolant.
Remove the radiator and cooling fans — this gives you access to the front of the engine.
Remove the accessory belts — alternator, power steering, and A/C belts.
Remove the timing belt covers — both upper and lower covers.
Set Engine to Top Dead Center (TDC)
Rotate the crankshaft pulley clockwise (as viewed from the front) until the mark on the pulley lines up with the 0° mark on the timing cover.
Check the camshaft marks. The marks on the camshaft sprockets should align with the marks on the timing covers. If they don't, rotate the crankshaft one full revolution and re-check.
Install the crank lock pin (if you have one) to keep the crank from moving.
Remove the Timing Belt and Components
Release the timing belt tensioner — use a 10mm hex bit to compress the tensioner and insert a pin to hold it.
Remove the timing belt. Mark the direction of rotation if you plan to reuse it (but you shouldn't — you're replacing it).
Remove the timing belt tensioner and idler pulleys. Note which bolts go where.
Remove the camshaft sprockets. You'll need to hold the sprockets with a tool or a strap wrench.
Remove the water pump (if you're replacing it, which you should).
Remove the Intake and Exhaust Manifolds
Remove the intake manifold. Disconnect all electrical connectors, fuel lines, and vacuum lines. Label everything. The intake manifold has 10mm bolts — keep them organized.
Remove the exhaust manifold. The nuts will likely be rusted — use penetrating oil and patience.
Remove the spark plugs — you'll want to inspect them for signs of coolant or oil contamination.
Remove the Cylinder Heads
Remove the valve cover gaskets. Clean all the old RTV from the cam cap surfaces.
Remove the camshaft caps. Use a 12mm hex bit socket. Keep the caps in order — they must go back in the same position.
Remove the camshafts. Be careful not to drop them on the floor. Store them in a safe place, oriented as they were removed.
Remove the head bolts. Use a 12-point 14mm socket. The head bolts are torque-to-yield — they will feel tight the whole way out. Do not reuse them.
Lift the cylinder heads off the block. They may be stuck — use a plastic or rubber mallet to gently tap them free. Do not pry between the head and the block with a metal tool — you'll damage the sealing surface.
Remove the old gaskets. They will likely be stuck. Use a plastic scraper to remove the gasket material. Do not use a metal scraper or a wire brush on the aluminum surface.
Clean Everything
This is the most critical step for a leak-free seal.
Clean the cylinder head surface. Use a plastic scraper, brake cleaner, and a Scotch-Brite pad (the fine kind, not the abrasive kind). Remove all old gasket material. The surface should be clean and smooth.
Clean the engine block surface. Same process — all old gasket material must be removed. Any leftover material will create a gap that the new gasket can't seal.
Clean the head bolt holes in the block. Use a tap or a thread chaser to clean the threads. Brake cleaner and compressed air to remove debris. This is critical — old debris in the holes will cause false torque readings and uneven clamping.
Check the heads for warpage. Use a straightedge and feeler gauges. The maximum warpage is 0.0015 inches (0.04mm). If the head is warped, take it to a machine shop for resurfacing.
Install the New Head Gaskets
Check the Fel-Pro MLS gaskets. They have a "Top" marking — make sure you install them with the correct side facing up. The orientation matters.
Install the gaskets dry. MLS gaskets do not require sealant or gasket spray. They seal with clamping force. Do not apply any sealant to the gasket surface.
Position the gaskets on the block. The head bolts will hold them in place temporarily.
Install the Timing Belt and Water Pump
Install the water pump (if you removed it) — torque the bolts to 14 ft-lb (19 N·m) in a crisscross pattern.
Install the new timing belt tensioner and idler pulleys. Torque to 30 ft-lb (40 N·m).
Install the timing belt. Follow the routing diagram:
Start with the crankshaft at TDC.
Route the belt over the crankshaft sprocket.
Route it over the driver's side camshaft sprocket, then the passenger's side camshaft sprocket.
Ensure the belt tension is correct — the tensioner will set the tension.
Release the timing belt tensioner. Remove the pin that's holding it compressed. The tensioner will take up the slack.
Verify timing. Rotate the crankshaft two full revolutions clockwise. Check that all timing marks align. If they don't, the belt is off a tooth — repeat the routing.
Reassemble Everything
Install the intake manifold — torque the bolts to 14 ft-lb (19 N·m) in a crisscross pattern.
Reconnect all electrical connectors, fuel lines, and vacuum lines. Check everything against your photos and labels.
Install the exhaust manifold — torque the nuts to 30 ft-lb (40 N·m).
Install the radiator and cooling fans.
Install the accessory belts.
Refill the engine oil with 5W-30 synthetic (5 quarts).
Refill the coolant with Subaru Super Coolant (premix).
First Start — Critical Steps
Prime the oil system: Crank the engine with the fuel pump fuse removed for 10 seconds. This builds oil pressure before the first start.
Start the engine. It will run rough for a few seconds. Listen for any abnormal noises — if you hear tapping or rattling, shut it off and re-check timing.
Check for leaks. Oil and coolant leaks around the head gasket area, valve covers, and water pump.
Bleed the cooling system. The EJ25 is notorious for air pockets. Use a vacuum filler if you have one — otherwise, run the engine with the radiator cap off and heater on full hot, topping off the coolant as the thermostat opens.
Check the cooling fans. Ensure they come on when the engine reaches temperature.
Check the oil and coolant levels after the engine has cooled. Top off as needed.
Torque Table — Fast Summary
Component | Torque (ft-lb) | Torque (N·m) | Notes |
|---|---|---|---|
Head bolts | See procedure above | See procedure above | Torque-to-yield, must replace |
Timing belt tensioner | 30 ft-lb | 40 N·m | |
Timing belt idler pulleys | 30 ft-lb | 40 N·m | |
Water pump | 14 ft-lb | 19 N·m | |
Cam caps | 9–14 ft-lb | 12–19 N·m | Use sequence from center outward |
Valve cover bolts | 7 ft-lb | 10 N·m | Do not overtighten |
Intake manifold bolts | 14 ft-lb | 19 N·m | |
Exhaust manifold nuts | 30 ft-lb | 40 N·m | |
Oil pan drain bolt | 30 ft-lb | 40 N·m | |
Spark plugs | 15 ft-lb | 20 N·m | Use anti-seize on threads |
Critical: Always verify torque specs against your vehicle's specific factory service manual. Different model years may have different specifications.
Common Pitfalls
🚫 Pitfall 1: Using a single-layer or cheap gasket
This is the mistake that creates repeat customers. A single-layer gasket or a cheap aftermarket gasket will fail. The Fel-Pro MLS is the answer. Spend the extra money.
🚫 Pitfall 2: Not cleaning the head bolt holes properly
Old debris in the head bolt holes will cause false torque readings. The bolts won't clamp properly, and the gasket will leak. Run a thread chaser through every head bolt hole. Use brake cleaner and compressed air.
🚫 Pitfall 3: Not replacing the head bolts
The head bolts are torque-to-yield. They stretch when torqued. Reusing them means you don't get the correct clamping force. Replace them. OEM or ARP — but replace them.
🚫 Pitfall 4: Reusing the old timing belt
Don't do this. If the timing belt fails, the engine is destroyed. The timing belt is cheap compared to a rebuild. Replace the belt, tensioner, and idlers.
🚫 Pitfall 5: Not using the correct coolant
Use Subaru Super Coolant. The EJ25's aluminum components are sensitive to improper coolant. Generic coolant can cause corrosion and contamination.
🚫 Pitfall 6: Not bleeding the cooling system properly
The EJ25 is prone to air pockets. If you don't bleed the system thoroughly, the engine will overheat and damage the new gaskets. Use a vacuum filler if you have one — or be prepared to spend a long time burping the system.
🚫 Pitfall 7: Overtightening the valve cover bolts
The valve cover bolts are small and strip easily. Use an inch-lb torque wrench (84 in-lb). If you tighten them with a 3/8" ratchet, you will strip the threads.
🚫 Pitfall 8: Not checking the valves and valve seals
If the heads are off, this is the time to check valve clearance and replace the valve seals. It's a few hours of work and adds maybe $50 in parts. It saves you from doing this job again.
🚫 Pitfall 9: Using RTV on the head gasket surface
Do not do this. Fel-Pro MLS gaskets seal with clamping force. RTV or sealant will create an uneven surface and cause the gasket to fail. The gasket goes on dry.
🚫 Pitfall 10: Not verifying timing before reassembly
Rotate the crankshaft two full revolutions by hand before you put everything back together. If the timing is off, the engine will run poorly or the pistons will hit the valves. Always verify timing.
Contributors
Role | Username | Notes |
|---|---|---|
Primary Author | @ej25_warrior | Based on 20+ EJ25 head gasket replacements across multiple Subaru models |
Technical Reviewer | @subaru_master_tech | Verified against Subaru factory service manual and TSBs |
Gasket Specialist | @engine_builder | Confirmed Fel-Pro MLS superiority over original gasket |
Safety Review | @senior_editor_01 | Safety Critical flag approved — engine work and cooling system failures can lead to overheating and engine fires |




No comments yet — grab the first one.